Monday:
- start with a prayer
- recite Pledge of Allegiance and/or family motto
- Song, “Oh, What Do You Do in the Summertime?” CS pg
- Scripture – Recite and Memorize “Ecclesiastes 3:1”
Shannans Additions: Okay – seriously…this whole lesson plan is my addition. It’s the only thing I’m going to genuinely come up with…and it’s not going to be that great.
The reason I’m doing it is because both my older kids are at day camp this week - they leave early in the morning and come back in the afternoon. It kind of screws up our school schedule because I’ll be dropping off and picking up instead of teaching. So, as not to have my little guys feel left out, we’re going to have a mini camp here, which I’ve dubbed “Camp Johnson”. It’s going to be mostly fun and crafts, and I hope they’ll enjoy it.
We will still do reading, vocabulary, journals, and computers. In fact, my big kids will still have to study vocabulary words and write in their journals everyday. Only they’ll be writing at night, and all week their journal topic will be: “Today at camp I…”. The little guys and I will also still do a field trip (I hope), and all the regular outings like library, movies, park, etc. while their big brothers and sisters are at camp.
Opening Exercise – When you go to camp, you get a “Camp Name”. It’s a code name that everyone calls you at camp. When the kids are little, they typically choose their own name. When you get older, a name gets “assigned” to you, and it usually has something to do with your personality, talents, or some embarrassing story from your past. You decide how you want your kiddos to get their names…just remember that while at “camp” you only call them by that name. (EX: Savannahs name is “Aquamarine”, and Josephs is “Dragon Keeper”).

Craft – Make camp shirts. It wouldn’t be camp without camp shirts, so we’ll be making ours first thing Monday morning. We’ll probably buy a tie-dye kit and tie-dye shirts from Wal-Mart. When they dry, I’ll use fabric paint to write “Camp Johnson” on the back and their camp names on the front. You can also take scissors and fringe the sleeves and bottoms of the shirts and add beads to bangle (although it is decidedly “girlie”).
Free Play/Family Activity – Build a camp fort. Gather any and all pop-up tents or tubes you have and make “camp”. If you don’t have tents, do it the way we did when I was a kid…use blankets and chairs and build a fort. (Now, I have a little house…so my furniture might get pushed against the wall or removed entirely to accomplish this). Try to leave space in the middle for your “common area/campfire”. Put sleeping bags, blankets, and pillows in the “tents”. When you have it all set-up, proceed with you day. Try to leave it up as long as possible…can you leave it up all week? (Yah, right).
 Art – Make these fun family totem poles. They require a lot of supplies, but you could use number 10 cans instead of coffee cans and use cheap plastic lids from the store. If I can gather the supplies, each of my kids will make a portrait. My big kids can work on it at night. And if you don’t have crazy colored exterior paint (I don’t)…use regular acrylic craft paint and buy outdoor clear craft sealant. It can be found with the spray paint at any craft store. I’ve never made them – but I always wanted to.
Tin Can Totem Poles
Nothing sets the mood at summer camp like a totem pole, especially one flickering in the light of a bonfire. Make a tin can version for your backyard camp by painting your family portraits on coffee cans.
CRAFT MATERIALS:
Materials for a 5-person totem pole:
5 coffee cans, each with 2 plastic lids that fit
Can opener
Water-based exterior paints in a variety of colors
Paintbrushes
Craft knife
Scissors
4 clear plastic milk or water jugs, emptied and cleaned
Marker
Liquid laundry detergent bottle, empty and cleaned
Wooden dowel 7/8 inch in diameter and 48 inches long
Duct tape
Time needed: About 1 to 2 Hours
1. First, cut the bottom off each coffee can with a can opener, then give a can to each person to paint his or her portrait on.
2. While the paint is drying, choose the can that you want to put on top of your totem pole and set 1 of its 2 lids to the side. Use a craft knife to cut a quarter-size asterisk in the center of each of the other lids, then set the lids aside.
3. Next, use scissors to cut the ridged spout from each plastic jug (recycle the rest of the jug) and set aside the spouts.
4. Finally, draw the wings on the detergent bottle, as shown, and cut them out (recycle the rest of the bottle).
5. Once the cans are dry, place a lid on the top and bottom of each, using the uncut lid for the top of the can that will crown your totem pole. As shown in the diagram at left, wrap a thick layer of duct tape about 6 inches from the bottom end of the dowel, then add the cans, jug spouts, and wings.
6. Place the finished totem pole in your yard by pushing the dowel into the ground.
 Outdoor Activities – Go on a scavenger hunt hike. Print up the worksheet at the end of the lesson, arm your kids with a magnifying glass and binoculars, and walk around your neighborhood looking for the items on the sheet. How many can you check off?
Vocabulary – camp, tent, craft, s’mores, bandana, lantern, campfire, hiking, canoe, archery, friend
Write words onto 3x5 cards and glue pictures (at end of lesson) to front. Big kids can review words and practice spelling, while little kids can work on picture/word recognition.
Journal – “Today at camp I…” Big kids can write about their adventures…Joseph (10) should be able to write 3-4 paragraphs (optional picture), Savannah (7) at least one well-structured paragraph (optional picture), Brigham (6) about three sentences and a picture, and Nicolette (3) will tell me what to write and I will write for her, and she will draw a picture.
Another fun idea would be to visit http://www.familyfun.com/. Under their “Summer” heading, there are some links to “Summer Printables”. There is a cute “Summer Camp Scrapbook”…the first link takes you to the cover and stickers. Skip the stickers unless you actually have sticker paper to print them on…when you go to print, it will tell you there are three pages…just print up the first (the second page is stickers and the third is an instruction sheet with only one sentence on it). The second Summer Scrapbbook link takes you to the Scrapbook pages. There are 4 pages in all…the first three are actual pages, and the fourth is instructions…so only print the first three. The pages have places for pictures and lines to write your favorite activities, moments, and friends. They are 8½ x 11 pages…you could cut them out and fit and glue them into their journal notebooks or put them in a folder or binder. Kinda cute!!!
Reading – One book/chapter each – Joseph and Savannah read aloud to group, Brigham reads with assistance, Nicolette chooses a book for mom to read
Computer – 30 minutes each on educational sites
Flashcards – Big kids can review math cards, and little guys can do alphabet, shapes, and numbers
Tuesday:
- Start off with a prayer
- Recite the Pledge of Allegiance and/or family motto
- Song, “Oh, What Do You Do in the Summertime?” , CS pg
- Scripture – Recite and Memorize “Ecclesiastes 3:1”
Free Play/Family Activity – Rebuild your fort, if you took it down. Can you make it differently?
Arts and Crafts – Make these super cute caps!!!
Campfire Caps

CRAFT MATERIALS:
For each cap, you need:
Felt, ½ yard of orange, two 9- by 12-inch sheets of yellow, and 1 yard of green
Scissors
Fabric glue or hot glue
Small twigs
6 to 8 mini marshmallows
2 large paper clips
Time needed: About 1 Hour
1. To make a cap, cut a strip of orange felt approximately 5 1/2 inches wide by 16 inches long. Cut the felt widthwise into flame shapes (see diagram).
2. Next, cut yellow felt triangle flames, about 1 1/2 inches wide at the base by 4 inches tall, and glue 1 to each orange flame.
3. Lay the felt with the yellow flames facing up and glue short twigs between the flames.
4. Next, cut a green felt strip 2 1/2 inches wide by 26 inches long and glue it along the bottom of the orange flames, sandwiching the twigs. The flames and twigs should poke out from the top of the green strip. Lay it flat to dry.
5. Once the glue dries, stick mini marshmallows on the twigs, then wrap the green strip around the camper's head. Use paper clips to secure the cap in place and trim off any excess felt.
Science/Safety/Environmental Responsibility and Awareness – Gather everyone in your common area and talk about forest fires. (Visit www.smokeybear.com/kids for ideas).
“Forests are extraordinary places which cover almost 1/3 of the Earth's land. They provide shade, food and shelter for an enormous variety of plants and animals which call them "home".Forests are invaluable to the Earth. Not only are they places of beauty and recreation, but all over the world people rely on trees for fuel, food, raw materials and medicine. Even more importantly, forest trees and plants ensure that the temperature on Earth is livable and that we have enough oxygen to breathe!One of the greatest threats to these forests is fire. Fire can destroy not only the lives and homes of the forests' plants and animals, but those of the people whose communities are nearby. Can a forest ever recover? The answer is a yes BUT, unfortunately, it can take a lifetime, or longer! An average forest of trees is about 70-100 years old – older than your grandparents. And trees in some forests can be 4,000-5,000 years old!
When the weather is hot, dry or windy, or when thunderstorms occur, there is the danger of forest fire. Forestry fire fighters have developed a system to calculate and distribute fire danger information and provide daily weather reports from more than 1,000 fire danger weather stations throughout the country.Additionally, the firefighters working with Smokey have expanded the tools they use to reduce and prevent forest fires that can occur under such dangerous conditions. They are using their old 'enemy' fire wisely and under selected conditions to clear forests of debris. These 'friendly' fires not only reduce undergrowth but help many plants reproduce and increase food for wild animals. But, most importantly, planned fires can lessen the possibility of an unplanned wildfire caused by lightning or human carelessness raging out of control.There are thousands of brave men and women who fight forest fires. They can use water or they can remove the fuel from the fire by cutting down trees or setting small fires to create a fire break. Firefighters' tools are necessarily limited. That's why it's especially important for you to practice forest safety!
Ready to roast that marshmallow, cook that meal, or tell stories around that campfire? Make sure that the adults building the campfire follow Smokey's Campfire Rules.Over half of the forest fires in this country are caused by human beings. Two of the ways you can help prevent forest fires are proper campfire building and match safety.
- Smokey’s friends don’t ever play with matches
- If you find matches, or see a younger child playing with matches, give them to a grown-up”
After reviewing all the above information, go over the rules of building a campfire. If you don’t know…here are the guidelines (as per Smokey Bear):
1. Dig a pit away from overhanging branches
2. Circle the pit with rocks
3. Clear a 5 foot area around the pit down to the soil
4. Stack extra wood upwind and away from the fire
5. After lighting, do not discard match until cold
6. Never leave a campfire unattended
7. Keep a bucket of water and a shovel nearby
Snack – Now that you’ve reviewed the rules, it’s time to learn how to build a proper campfire…only we’re going to make a campfire we can eat!! Here are the instructions:
A Campfire You Can Eat
Not only is this snack fun to build and delicious to munch, but the process of preparing it also teaches campers the how-tos of safe campfire building.
RECIPE INGREDIENTS:
12-inch flour tortilla
Red licorice rope
Peanuts
Peanut butter
Fried Chinese noodles
Tootsie Rolls
Mini pretzel sticks
White grape juice
Hot cocoa powder
Candy corn
1. To make an edible campfire, first clear a space on the table to build a safe fire. Lay down a tortilla fire base and wrap a licorice rope safety circle around the tortilla about an inch in from the edge. Build a peanut rock ring halfway between the safety circle and the center of the fire base. Spread a circle of peanut butter in the center of the fire base, then lay a small handful of fried Chinese noodles on top for kindling.

2. Lay Tootsie Roll logs around the peanut butter circle. Use mini pretzel sticks as fuel wood to build a tepee inside the ring of logs and over the kindling, sticking the pretzels into the peanut butter at a 45-degree angle.

3. Add another layer of logs, setting them across the corners of the first layer to form a box around the tepee. Lay a few more pieces of fuel wood across the logs.
 4. Make sure buckets of water (glasses of grape juice) and dirt (hot cocoa powder) are nearby to put out the fire if necessary, then light the fire by adding candy corn flames.
 5. After the camp director approves the fire, throw dirt on the fire to put it out. Now, the moment the fire builders have been waiting for: Eat your fires!
Vocabulary – copy vocab words 3x each…in cursive for big kids, in print for Brigham, and Nicolette can draw pictures of the words.
Journal – same drill as Monday (same topic and everything)
Reading – same drill as Monday – try reading in your tents with flashlights!!
Computer – I am going to let the kids go on www.smokeybear.com/kids today. There are a lot of games. Also – if I had bigger kids at home this week, there is a section called “Only You” that has some GREAT stuff about fires, firefighting, and even prescribed firefighting (it talks about how sometimes fire is necessary for forests to grow). There is some GREAT science stuff in there. There is also a section about the history of Smokey Bear – which would be a great history lesson, and lots of coloring pages. If you can, I recommend checking out the site and using it to further your kids fire safety knowledge. Later lessons include some on forest life and home fire safety. This would give them a heads up on both upcoming themes.
Flashcards – same as Monday
Wednesday:
- Start off with a prayer
- Recite the Pledge of Allegiance and/or family motto
- Song, “Oh, What Do You Do in the Summertime?” , CS pg
- Scripture – Recite and Memorize “Ecclesiastes 3:1”
Free play – If you had to take it down, and are feeling up to it – rebuild your camp
Science – Sky Watching: The sky above can be fascinating…be a sky watcher. Go outside and lay on your backs and look the clouds in the sky. How many different shapes do you see? What do the clouds look like on rainy days? What do they look like on sunny days?
Make a cloud picture. You will need: blue construction paper, cotton balls, and glue.
- Twist or cut the cotton balls into cloud shapes you saw in the sky
- Glue your clouds to the paper
Drama/Creative Movement - Storm Warning: There are many types of storms. Make up your own “group storm”. In a clear space, have each person act out one part of a storm – the wind, thunder, lightening, clouds, rain, snow, hail, etc. Then create a giant storm by having everyone act out a part at the same time. How will each person’s part change as the “weather” changes?
More Science/Art – Visit http://www.noaa.com/. In the “Search” box – type in “Kids”, and it will take you to several links that have reading materials, games, quizzes, and fun. See if you can make a family disaster plan on-line for hurricane season. Print up Owlies hurricane preparedness coloring pages. Learn the names of the hurricanes for 2008. (It would also be a good idea to visit this site in advance, and have all your supplies ready to go. Then, instead of going over everything on-line, you can do a tour of your home with a check-list to make sure you are ready and prepared, and everyone knows what to do in case of a hurricane…or other natural disaster, if you’re not in Florida. There is info on tornados, severe winter weather, flooding, etc.)
Snack – Make Oven S’mores. (You can make s’mores on the grill, but on a hot day – this is just easier)
- Turn your oven or toaster oven to the “broiler” setting
- Place half a graham cracker on a cookie sheet and top with one marshmallow
- Cook under broiler until mallow starts to lean and brown
- Remove and quickly top with chocolate squares and other half of graham cracker
- Eat with wet wipes close by!!! Delicious and messy!!!
Vocabulary – older kids write definitions to vocab words. Brigham and Nicolette draw pictures of vocab words.
Reading – repeat (probably in tents, again)
Journal – repeat
Flashcards – repeat
Computer – I can’t recommend enough that if you have older kids at home this week – do a little extra research and elaborate on the storm and sky stuff. There is so much info out there – and all you have to do is press “Print”. If you get any great finds, please feel free to pass them on – I’ll post them for everyone to use!! I’ll be printing up NOAA’s chapter on Hurricanes for my little guys to color, and we’ll do the home preparedness walk-through. But please do whatever you feel would enrich your kids!! The science stuff on storm-watching alone would keep any elementary-school ages child VERY busy!!
Thursday:
- Start off with a prayer
- Recite the Pledge of Allegiance and/or family motto
- Song, “Oh, What Do You Do in the Summertime?” , CS pg
- Scripture – Recite and Memorize “Ecclesiastes 3:1”
Free Play – C’mon, now!! Get those tents up!! You know you want to!!
Games – Make an obstacle course/relay race for your kids. Time them to see how fast they are. Line up tents for them to crawl through, or make a tunnel with chairs and blankets. Have a sleeping bag on one end they have to roll up and secure. Have them use a flashlight to find a small item in a duffle bag full of stuff. Sweep the campsite. Leap over a “river” (a blanket on the floor). Blow a whistle. WHATEVER!! Make it fun and engaging.
Craft – “Gods-Eye” Memory Keepers…the most classic of all camp crafts…
God's-Eye Memory Keeper
Vocabulary – copy vocab words 3x each…in cursive for big kids, in print for Brigham, and Nicolette can draw pictures of the words.
Journal – same drill as Monday (same topic and everything)
Reading – same drill as Monday – try reading in your tents with flashlights!!
Computer – I am going to let the kids go on www.smokeybear.com/kids today. There are a lot of games. Also – if I had bigger kids at home this week, there is a section called “Only You” that has some GREAT stuff about fires, firefighting, and even prescribed firefighting (it talks about how sometimes fire is necessary for forests to grow). There is some GREAT science stuff in there. There is also a section about the history of Smokey Bear – which would be a great history lesson, and lots of coloring pages. If you can, I recommend checking out the site and using it to further your kids fire safety knowledge. Later lessons include some on forest life and home fire safety. This would give them a heads up on both upcoming themes.
Flashcards – same as Monday
Wednesday:
- Start off with a prayer
- Recite the Pledge of Allegiance and/or family motto
- Song, “Oh, What Do You Do in the Summertime?” , CS pg
- Scripture – Recite and Memorize “Ecclesiastes 3:1”
Free play – If you had to take it down, and are feeling up to it – rebuild your camp
Science – Sky Watching: The sky above can be fascinating…be a sky watcher. Go outside and lay on your backs and look the clouds in the sky. How many different shapes do you see? What do the clouds look like on rainy days? What do they look like on sunny days?
Make a cloud picture. You will need: blue construction paper, cotton balls, and glue.
- Twist or cut the cotton balls into cloud shapes you saw in the sky
- Glue your clouds to the paper
Drama/Creative Movement - Storm Warning: There are many types of storms. Make up your own “group storm”. In a clear space, have each person act out one part of a storm – the wind, thunder, lightening, clouds, rain, snow, hail, etc. Then create a giant storm by having everyone act out a part at the same time. How will each person’s part change as the “weather” changes?
More Science/Art – Visit http://www.noaa.com/. In the “Search” box – type in “Kids”, and it will take you to several links that have reading materials, games, quizzes, and fun. See if you can make a family disaster plan on-line for hurricane season. Print up Owlies hurricane preparedness coloring pages. Learn the names of the hurricanes for 2008. (It would also be a good idea to visit this site in advance, and have all your supplies ready to go. Then, instead of going over everything on-line, you can do a tour of your home with a check-list to make sure you are ready and prepared, and everyone knows what to do in case of a hurricane…or other natural disaster, if you’re not in Florida. There is info on tornados, severe winter weather, flooding, etc.)
Snack – Make Oven S’mores. (You can make s’mores on the grill, but on a hot day – this is just easier)

- Turn your oven or toaster oven to the “broiler” setting
- Place half a graham cracker on a cookie sheet and top with one marshmallow
- Cook under broiler until mallow starts to lean and brown
- Remove and quickly top with chocolate squares and other half of graham cracker
- Eat with wet wipes close by!!! Delicious and messy!!!
Vocabulary – older kids write definitions to vocab words. Brigham and Nicolette draw pictures of vocab words.
Reading – repeat (probably in tents, again)

Journal – repeat
Flashcards – repeat
Computer – I can’t recommend enough that if you have older kids at home this week – do a little extra research and elaborate on the storm and sky stuff. There is so much info out there – and all you have to do is press “Print”. If you get any great finds, please feel free to pass them on – I’ll post them for everyone to use!! I’ll be printing up NOAA’s chapter on Hurricanes for my little guys to color, and we’ll do the home preparedness walk-through. But please do whatever you feel would enrich your kids!! The science stuff on storm-watching alone would keep any elementary-school ages child VERY busy!!
Thursday:
- Start off with a prayer
- Recite the Pledge of Allegiance and/or family motto
- Song, “Oh, What Do You Do in the Summertime?” , CS pg
- Scripture – Recite and Memorize “Ecclesiastes 3:1”
Free Play – C’mon, now!! Get those tents up!! You know you want to!!
Games – Make an obstacle course/relay race for your kids. Time them to see how fast they are. Line up tents for them to crawl through, or make a tunnel with chairs and blankets. Have a sleeping bag on one end they have to roll up and secure. Have them use a flashlight to find a small item in a duffle bag full of stuff. Sweep the campsite. Leap over a “river” (a blanket on the floor). Blow a whistle. WHATEVER!! Make it fun and engaging.
Craft – “Gods-Eye” Memory Keepers…the most classic of all camp crafts…
God's-Eye Memory Keeper
 Kids love this traditional Mexican yarn craft because of its fun weaving technique, and this framed variation is perfect for displaying your family's summer vacation mementos.
CRAFT MATERIALS:
6 sticks, two 18 inches long and four 14 inches long
1 or 2 skeins of variegated yarn
Scissors
Hand pruners (to cut sticks, a parent's job)
Time needed: Under 1 Hour
1. Start by crossing the 2 longest sticks as shown above. Tie the loose end of the yarn around the intersection and wind it around several times to secure the sticks. Next, wrap the yarn around the closest stick, flush against the intersection. Now wrap it around the next closest stick. Continue in this manner, working your way toward the ends of the sticks until only about 3 inches remain exposed. Cut the yarn and knot the end around a stick.
2. To add a frame, place the 4 smaller sticks in a square around the edge of the weaving, wrap yarn around the intersections of the sticks, and tie them in place, as shown at left. Finally, tuck summer vacation photos and souvenirs between the strands of yarn.

Snack – Make “Gorp” AKA “Trail Mix”. Combine peanuts, M&M’s, raisins, granola…and anything else you feel like adding (suggestions are pretzel sticks, banana chips, dried cranberries, cherries, dates, or apricots {snipped with scissors}, other nuts, cherrios, coco puffs, or capt’crunch…don’t forget your left-overs from your edible campfire snack!). Eat it while story-telling or watching movies.
Reading/Creative Play – Storytelling. It just wouldn’t be camp if we couldn’t listen to stories around the campfire. Native Americans are some of the many people who’ve used stories to teach children , pass down history and genealogy, and share wisdom. Our own American heritage is filled with folklores and legends about great deeds. At the library, pick up some books about Tall Tales and Native American legends (or look them up on-line). Can you re-tell the stories in your own words? Can your children? Have the older children read a story to them selves and then re-tell it in their own words to their little brothers and sisters. (They can dress-up, too – to make it more fun!!) Or read these tales to your kids!!
Some suggestions for American Folklore:
Johnny Appleseed, Hiawatha, Molly Brown,
Paul Bunyan, Rip Van Winkle, King Kaamehameha,
Pecos Bill, John Henry, Casey Jones,
Daniel Boone, Zorro, Mike Mulligan,
Davy Crocket, Ichabod Crane, Annie Oakley
Native American Tales:
Ka-ha-si and the Loon (Inuit), Rough-faced Girl (Algonquin),
Little Firefly (Algonquain), Dragonfly’s Tale (Zuni),
Turquoise Boy (Navajo), Dancing Drum (Cherokee),
Quillworker (Cheyenne)
Additional Fun – If you have any animated features or short films about these stories – it would be fun to watch them today. You could eat your “Gorp”!!
Vocabulary – Use vocabulary words in a sentence. Big kids can write on their own – little guys can dictate if necessary.
Reading – taken care of by storytelling activity
Journal – same old, same old
Flashcards – ditto
Computer – 30 minutes on Educational sites!!
Friday:
- Start off with a prayer
- Recite the Pledge of Allegiance and/or family motto
- Song, “Oh, What Do You Do in the Summertime?” , CS pg
- Scripture – Recite and Memorize “Ecclesiastes 3:1”
Cooking – Make this cake RIGHT AWAY!! Or, if you’ll have too much help (you know what I mean!!), do it the night before and have it ready to go on your last camp day!!
Campfire Cake
Built with frosted pound cake logs, doughnut hole embers, and fruit leather flames, it's sure to be the tastiest -- and easiest -- campfire you'll ever make.
 RECIPE INGREDIENTS:
2 pound cakes
2 1/2 cups chocolate frosting
1 cup plus 2 tablespoons white frosting
12 to 15 glazed chocolate doughnut holes
Confectioners' sugar
Red and orange decorators' gel
Red, orange, and yellow fruit leather
Scissors
1. With a knife, shave the square edges off the cakes to give them a log shape. Next, mix 1/4 cup of chocolate frosting into 1 cup of white to make a light tan. Place one log on a platter (a dab of frosting on the bottom will help hold it in place). Frost it with the chocolate and tan frostings as shown. To create bark and tree rings, scrape the tines of a fork across the chocolate frosting, then scratch a spiral into each tan end.

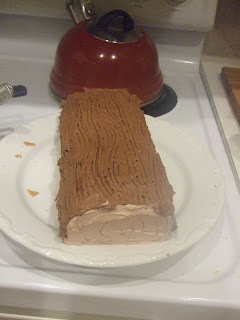
2. Pour the doughnut holes into a bowl and sprinkle them with confectioners' sugar. Arrange 10 doughnut-hole embers in a single layer next to the frosted log, sticking them in place with frosting.


 4. For flames, take a piece of fruit leather and, with the backing still in place, lightly wet half (lengthwise) of the fruit side with water. Fold it in half lengthwise and press to seal. Cut out flame shapes with scissors as shown, then remove the backing.


Free Play/Family Activity – LAST DAY!! YOU CAN DO IT!! Gather your strength and get those tents up for one more day (just keep reminding yourself that your kids are having a BALL, and they’re NEVER going to forget this, and right now you’re the COOLEST mom EVER, and remind yourself that its just ONE week out of ONE summer out of ONE year of their very short childhood – and you’ll find that today you’ll make the best tent city of the whole week!!).
Astronomy – Look up constellations on-line or refer to an astronomy web-site. Use an oatmeal container, Pringles can, or any cylindrical container with a bottom. Draw a constellation on the bottom by punching dots through the container. In a very dark room (or a dark tent…you can make it darker by covering it with a blanket), shine a flashlight through the container to light up the constellation on a wall or ceiling.
Craft – Make a rock necklace…
Rock Necklaces
A variation on the age-old nature necklace, these wire-wrapped pendants are fun for kids to trade. Some girls paint their names on one side and their best friend's on the other, and wear them as a proclamation of their unbreakable bond.
CRAFT MATERIALS:
A small rock
Colored wire (we used 22-gauge)
Scissors
Pencil
Needle-nose pliers
Colored leather cord
Time needed: Under 1 Hour
1. Place the rock at the center of a 15-inch-long piece of wire and wrap the wire around the rock a few times to secure it.


3. For the branch stub, cut a 1-inch slice from one end of the second log and trim it into a 2-inch circle; set the piece aside. Frost the bottom of the log and set it in place as shown. Use frosting to stick the stub to the second log. Create bark and rings again.
4. For flames, take a piece of fruit leather and, with the backing still in place, lightly wet half (lengthwise) of the fruit side with water. Fold it in half lengthwise and press to seal. Cut out flame shapes with scissors as shown, then remove the backing.5. Slice 2 doughnut holes in half. Put a dollop of the remaining white frosting onto the cut surface, then set a flame on top. Squeeze decorators' gel over the decorated doughnut holes, then set them on the platter. Use any remaining doughnut holes to fill in the gaps between the logs. Decorate them with more flames and gel, if desired.
Free Play/Family Activity – LAST DAY!! YOU CAN DO IT!! Gather your strength and get those tents up for one more day (just keep reminding yourself that your kids are having a BALL, and they’re NEVER going to forget this, and right now you’re the COOLEST mom EVER, and remind yourself that its just ONE week out of ONE summer out of ONE year of their very short childhood – and you’ll find that today you’ll make the best tent city of the whole week!!).
Astronomy – Look up constellations on-line or refer to an astronomy web-site. Use an oatmeal container, Pringles can, or any cylindrical container with a bottom. Draw a constellation on the bottom by punching dots through the container. In a very dark room (or a dark tent…you can make it darker by covering it with a blanket), shine a flashlight through the container to light up the constellation on a wall or ceiling.
Craft – Make a rock necklace…
Rock Necklaces
A variation on the age-old nature necklace, these wire-wrapped pendants are fun for kids to trade. Some girls paint their names on one side and their best friend's on the other, and wear them as a proclamation of their unbreakable bond.
CRAFT MATERIALS:
A small rock
Colored wire (we used 22-gauge)
Scissors
Pencil
Needle-nose pliers
Colored leather cord
Time needed: Under 1 Hour
1. Place the rock at the center of a 15-inch-long piece of wire and wrap the wire around the rock a few times to secure it.
2. Twist together the ends, then wrap the twist around a pencil to form a loop. Use pliers to close the loop, then cut off any excess wire.
3. To finish, thread a necklace-length piece of leather cord through the loop and knot the ends.
Vocabulary – Spelling test for big kids, word recognition test for Brigham & Nicolette
Reading – same as Mon, Tues, Wed…
Journals – same as all week
Flashcards – same as all week
Computer – same as all week
Field Trip – Take your kids canoeing, or hiking, or plan an overnight camp-out in tents in your backyard 9or go away for the weekend).


1 comment:
Shannan, you absolutely amaze me! I can't believe how grown up your kids are getting...Nicolette and Brigham I still remember as little babies...it is so funny how I expect your kids/family to stay how I remember them...while mine grow just as fast :)!
Post a Comment